
Gary's Awesome Adventures in Amplitude Modulation (AM Radio Transmission & Reception) :
Prepping the Johnson Viking Ranger for Station Use, Part 4.

There are a number of reasons to install a PTT (Push To Talk) relay into a Johnson Viking Ranger, not the least of which is to save wear and tear on the "Operate" switch. Without a PTT switch, it is, of course, possible to do AM phone, just rotate the switch between Phone and Standby. And that will work. However, these rotary switches were not meant for constant off and on operation! They were designed to be positioned and parked for a while, like a band switch. The original Potter & Brumfield relay switch was recommended by Johnson as the relay of choice, and recently I discovered that some Rangers actually came pre-wired for this relay. Mine was. Either that, or whoever did the wiring did an absolutely professional job soldering the wires in place, wrapped and taped the wires above deck near where the relay was to be installed in pre-drilled holes to place the mounting screws... but never actually installed the relay switch!! The tape used to band these wires was yellowed and brittle with age, as if whenever the taping was done was about the time the radio was made.
Cruising about the internet forums informed me that indeed, some factory Rangers were, in fact, pre-wired. That was news to me. If anyone has documentation to this effect, please let me know at wd4nka@gmail.com. I'll post the documentation to my blog. Until then I will classify this bit of information as a definite maybe.
Potter & Brumfield relay switching aside, D-Labs has come out with a better solution that accomplishes two design goals: to provide a non-drill solution for PTT switching, and to solid-state the low voltage rectifier. The wiring is at most at least as intensive as the original PTT wiring plan indicated on pages 19 and 20 in the Ranger Operations manual. As it turns out, all but two of of wiring required for the K1 or K2 relay is already in place if installing in a pre wired Ranger such as mine, if yours is not, said wiring is not all that hard. Only two solder points were actually challenging, but as I will share in this installment, there are work-arounds to make things easier.
First, let me share D-Lab's video covering the K1 installation. This will apply to the K2 as well. For what you get, they are well worth the money!
Terry's video shows the basic installation of the K1 relay. Later, he produced the K2 relay, which is the same as the K1, with the same wiring, but the K2 provides for two more switch functions which can be utilized according to the installer's discretion. You can key a transmit light, you can kill screen current in the modulators when the modulator is switched off, you can key an ACR, any number of things.
I purchased the K2 relay, although I had no immediate plans on how to used these extra relay ports. Probably at a future date I'll look into keying an ACR, but the jury's out. Maybe later I'll tackle that, but for now, I just wanted a PTT relay, and yeah, nice to reduce some heat by SSing the low voltage relay. I am not very comfortable SSing the 5R4 HV rectifier simply because the components in place are designed around the voltage drop of this rectifier. Since it is high voltage, and since there is little to no VR drop using silicon diodes, that B+ rail will be significantly higher. It's not such a big deal with the low voltage rectifier. So I opted to keep the 5R4 in place.
The next video is for D-Lab's K2 relay. It's worth watching even if the basic rely wiring is identical to the K1. Terry gets into what to do with the extra relay ports, which may spark some ideas.
Wish I could get my daughter to do one of my videos with me. Oh, well......
Terry pretty much covers the installation, and I'll not repeat everything here in this installment. What I have endeavored to do is address a couple snags I ran into. Like I said, my rig came pre-wired for the Potter & Brumfield relay, which is close to the wiring of the K1/K2 relays.... but not identical.
Most of the wiring involves accessing the front wafer of SW4, patially above deck, partially below deck. There are two black wires soldered onto clip 8 of SW4 (front) wafer... the wafer closest to the front panel, the one behind the (rear) wafer. These are to be removed and soldered onto the black wire pre-wired onto the K1/K2 board. These two wires were in fact removed, only in a rather round-about manner, and fed below deck where they were soldered together and covered with rubber tubing. Another wire was soldered to this joint and fed above deck, and taped off. A wire ran from clip 8 of this same rear wafer, accessed from below deck, and fed back up above deck, wrapped and taped off. I noticed that these wires, all black, were the exact same wires used for all the black insulated wiring done on this rig! Clip 5 goes to the white wire pre-soldered to the relay board, and again, a black wire was already soldered into place, fed above deck, and taped off. Wow, this was gonna be easy! All I had to do was solder a wire onto SW4 (front)'s clip 8, run a wire from pin 2 of the mic jack (a cap to ground was already in place) to pin 4 of V-12, and boom! Ready to go.
Then I looked at where this pin-4 was. Hidden under that big log of a variable ceramic resistor (R35), and that resistor was bracketed into place, and the screws that held those brackets were danged near impossible to reach. Since that resistor (R35) is pretty fragile.... I needed to think this one out. Here's what resulted:

There it is. R35. One bracket behind a choke, the other tucked up under the lip of the chassis, where none of my tools could reach well. The brackets are screwed through the rear apron of the chassis, through the bracket mounting holes, the lock washer and nut bolting up from the inside. I did manage to get a needle nose in there to just loosen the nut from the inside, assisted by counter turning with a screwdriver the screw from the outside. At length the screw came out, my finger keeping pressure on the nut so it wouldn't drop. That pressure was enough for it to stick for a couple seconds on my finger, enough to remove it from the scene.
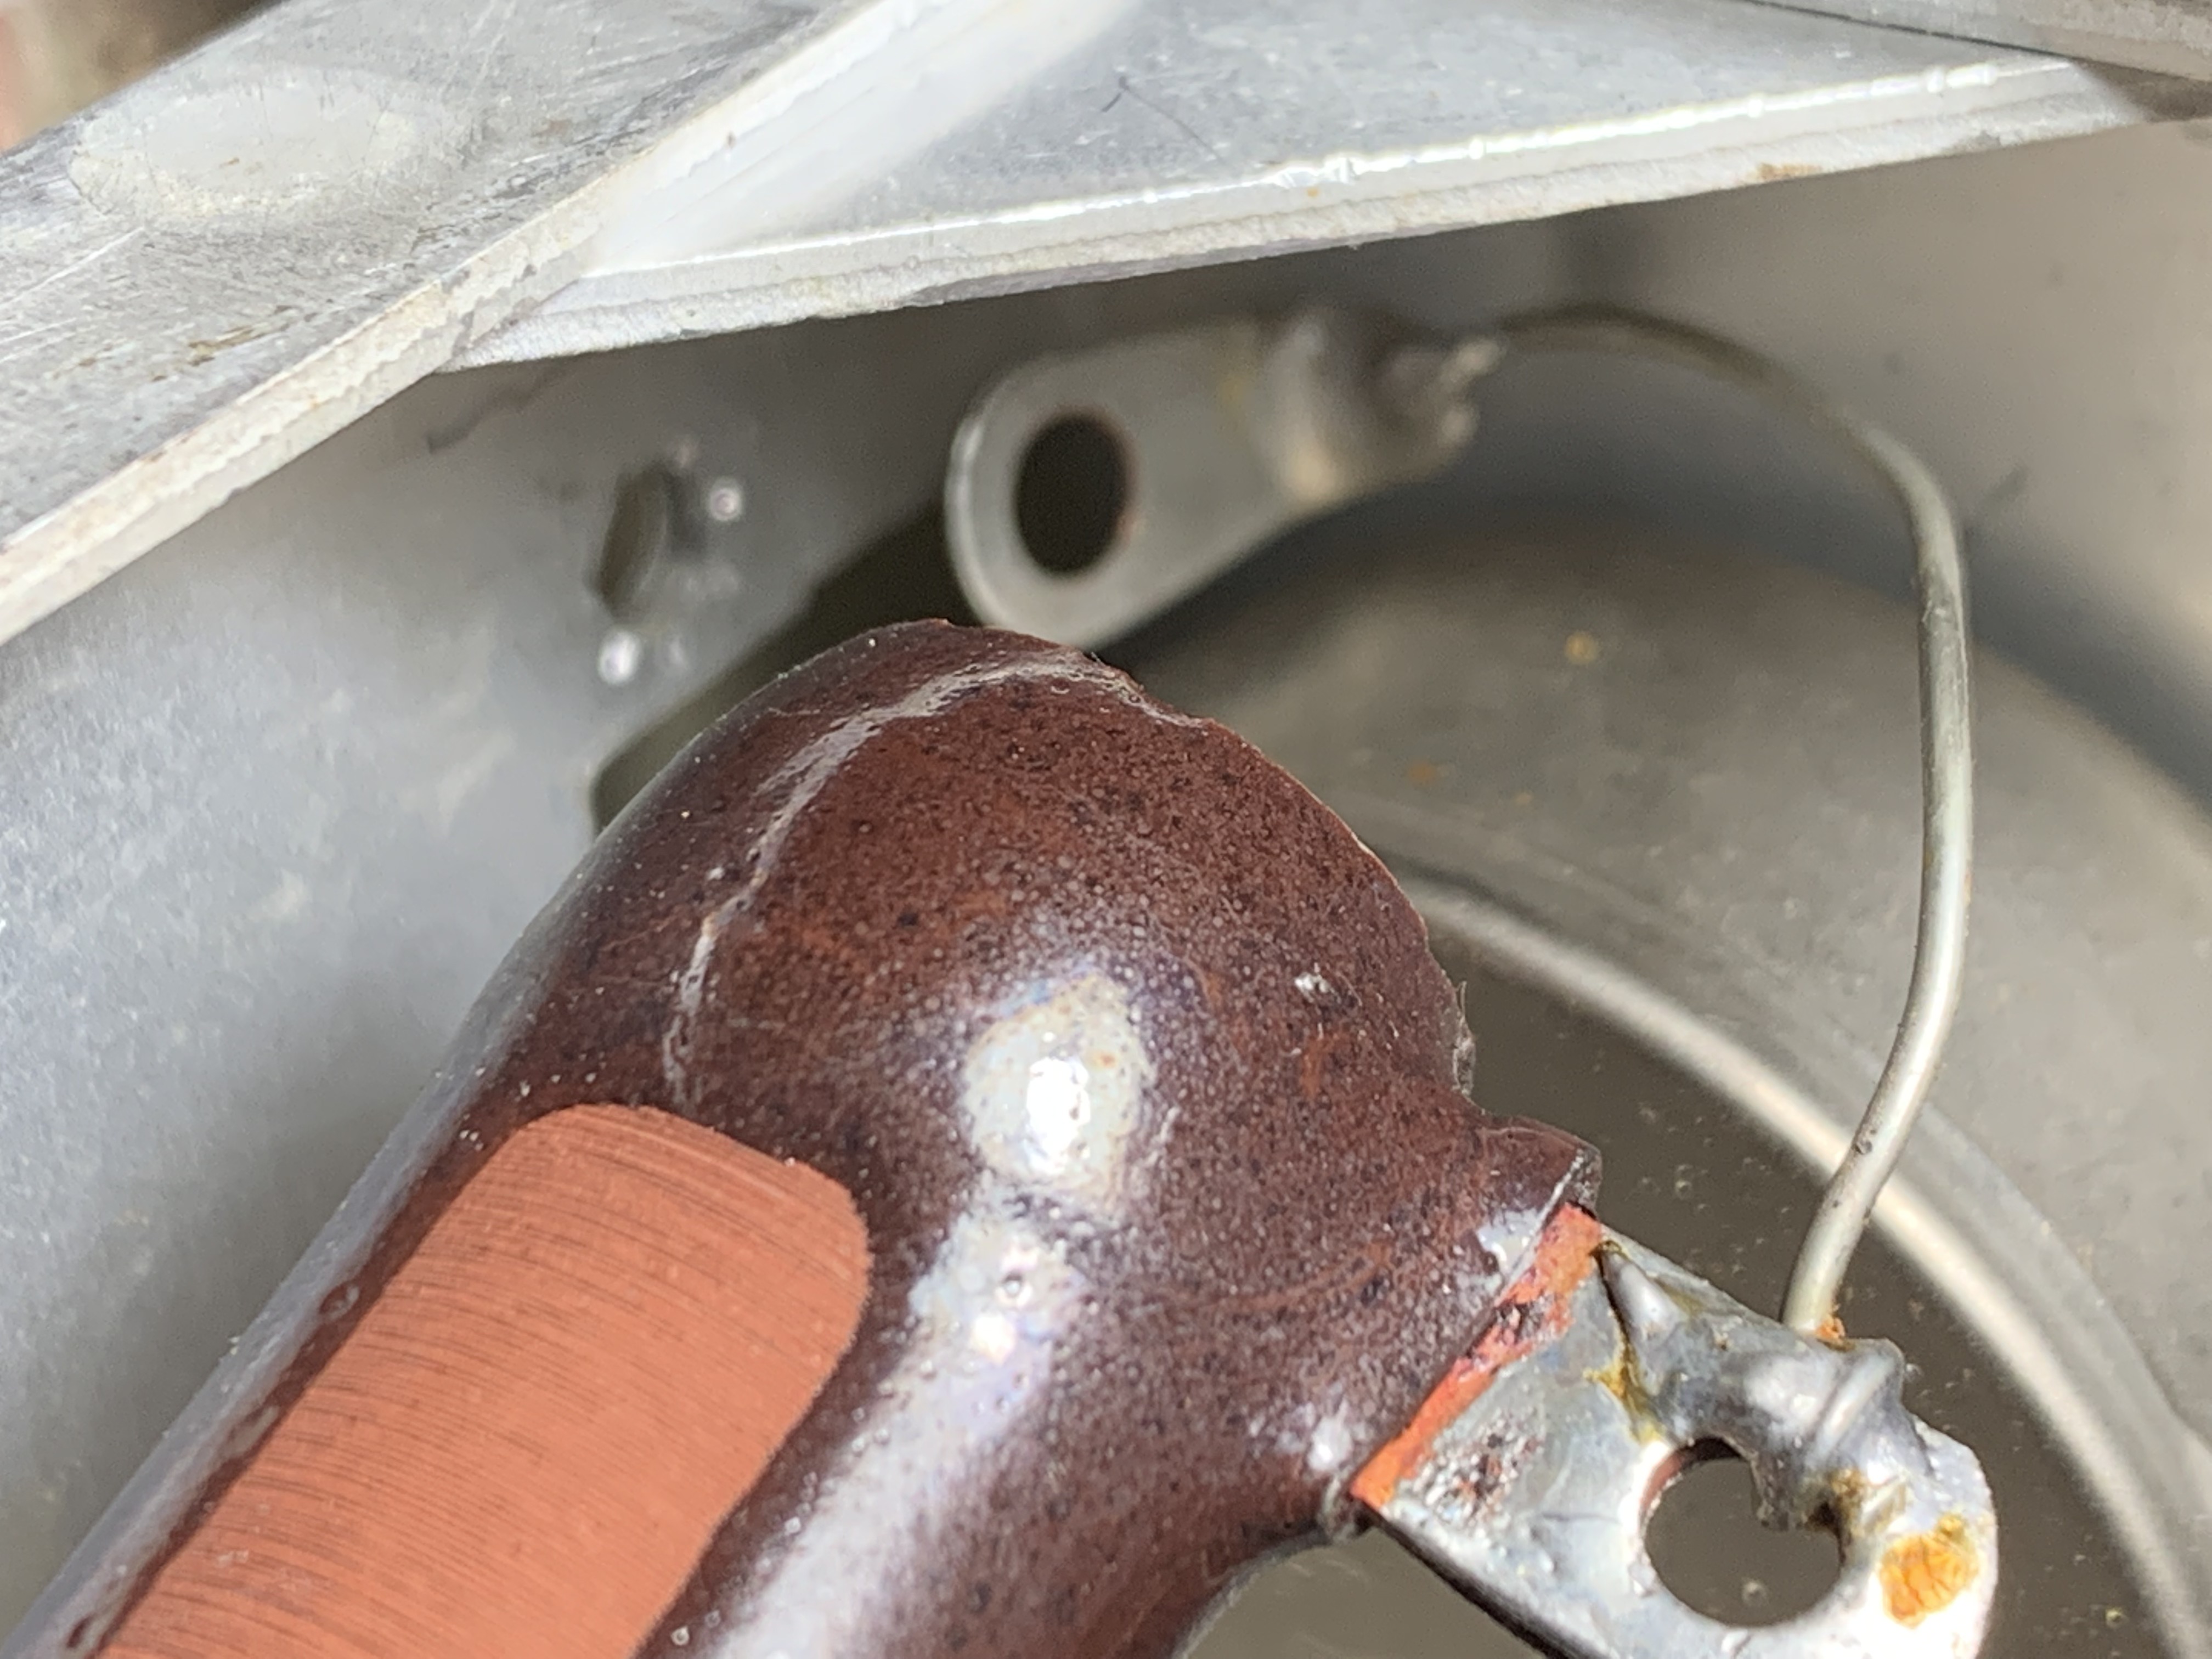
The screw was then pulled out from the back, and the bracket removed. You can see that R35 is grounded at one end via a soldered eyelet that is held by the bracket screw. No... the resistor isn't cracked. Believe it or not, that line you see on the resistor is a reflection. Trust me. I had to look twice when I saw this photo on my I-Phone.
One nice thing about these mounting screws is the use of lock washers. On the other side of the resistor I could just turn the screw from the back of the rear apron, just enough to allow me to move R35 upward, and clear the way to access pin 4 of V12.

Here is a photo of R35, moved up just high enough to clear V12. Even though things are still a little cramped, it was at least reachable by the soldering pencil.

Here is a close-up of V12. Pin four is the vacant pin at the 1-oclock position, and is clear of anything soldered to it. The wire soldered to it came from Pin 2 of the mic socket, and was threaded across the chassis to this point, as near to the chassis as possible. It is the only really long wire run in the transmitter. The task remained to put R35 back where I found it. That wasn't going to be easy since the bolt is beneath the chassis edge-lip, inaccessible for any of my nut drivers and other handy tools.
I discovered that a wooden barbecue skewer could thread an 8-32 washer. This would be what I would use to position the nut from the inside.

This solved the holding of the nut from the inside under-deck of the chassis, but the screw had to be re-inserted through the rear apron, and the resistor ground eyelet placed between the bracket and the nut and lock washer.

This was solved by taping the screw in place temporarily, for which I used both hands to hold resistor, bracket, lock washer, eyelet and nut in place. The tape was subsequently removed after everything was tightened.
With the audio wire in place, I moved on to the last remaining wire pre-soldered to the K2 relay, the Red wire. This would go to SW4 (front) clip 6.

Yeah, right.
This was one congested place! You can see the earlier mentioned two wires that were removed from SW4 (front) clip 8, soldered together, and the single black wire soldered to this pair, leading to the upper deck, eventually connecting to the pre-soldered K2 relay's black wire. You can see the heat shrink insulation to the left, before I wrote "black" on it, and slid it over this junction and shrank it. But you can barely barely even see SW4 (front)'s clip 6! Soldering here could hardly be considered. Not with my 20 watt soldering pencil. I made a close inspection of the switch, both above and below deck. No hobbyist with average soldering equipment is going to safely solder a connection to this clip as it is. I was faced with a major task of removing, some how, some of this congestion and then re-soldering all of it. That was not in the cards, gang.
With a flashlight, and with moving some of the wires a bit, I could find the green and white wire that was soldered to the clip 6. According to both the pictorial and schematic provided by D-lab, this green and white wire ran directly to pin 3 of the 6146. I looked at the schematic to see if there were other points along the way, or any terminus connections I needed to be concerned about.
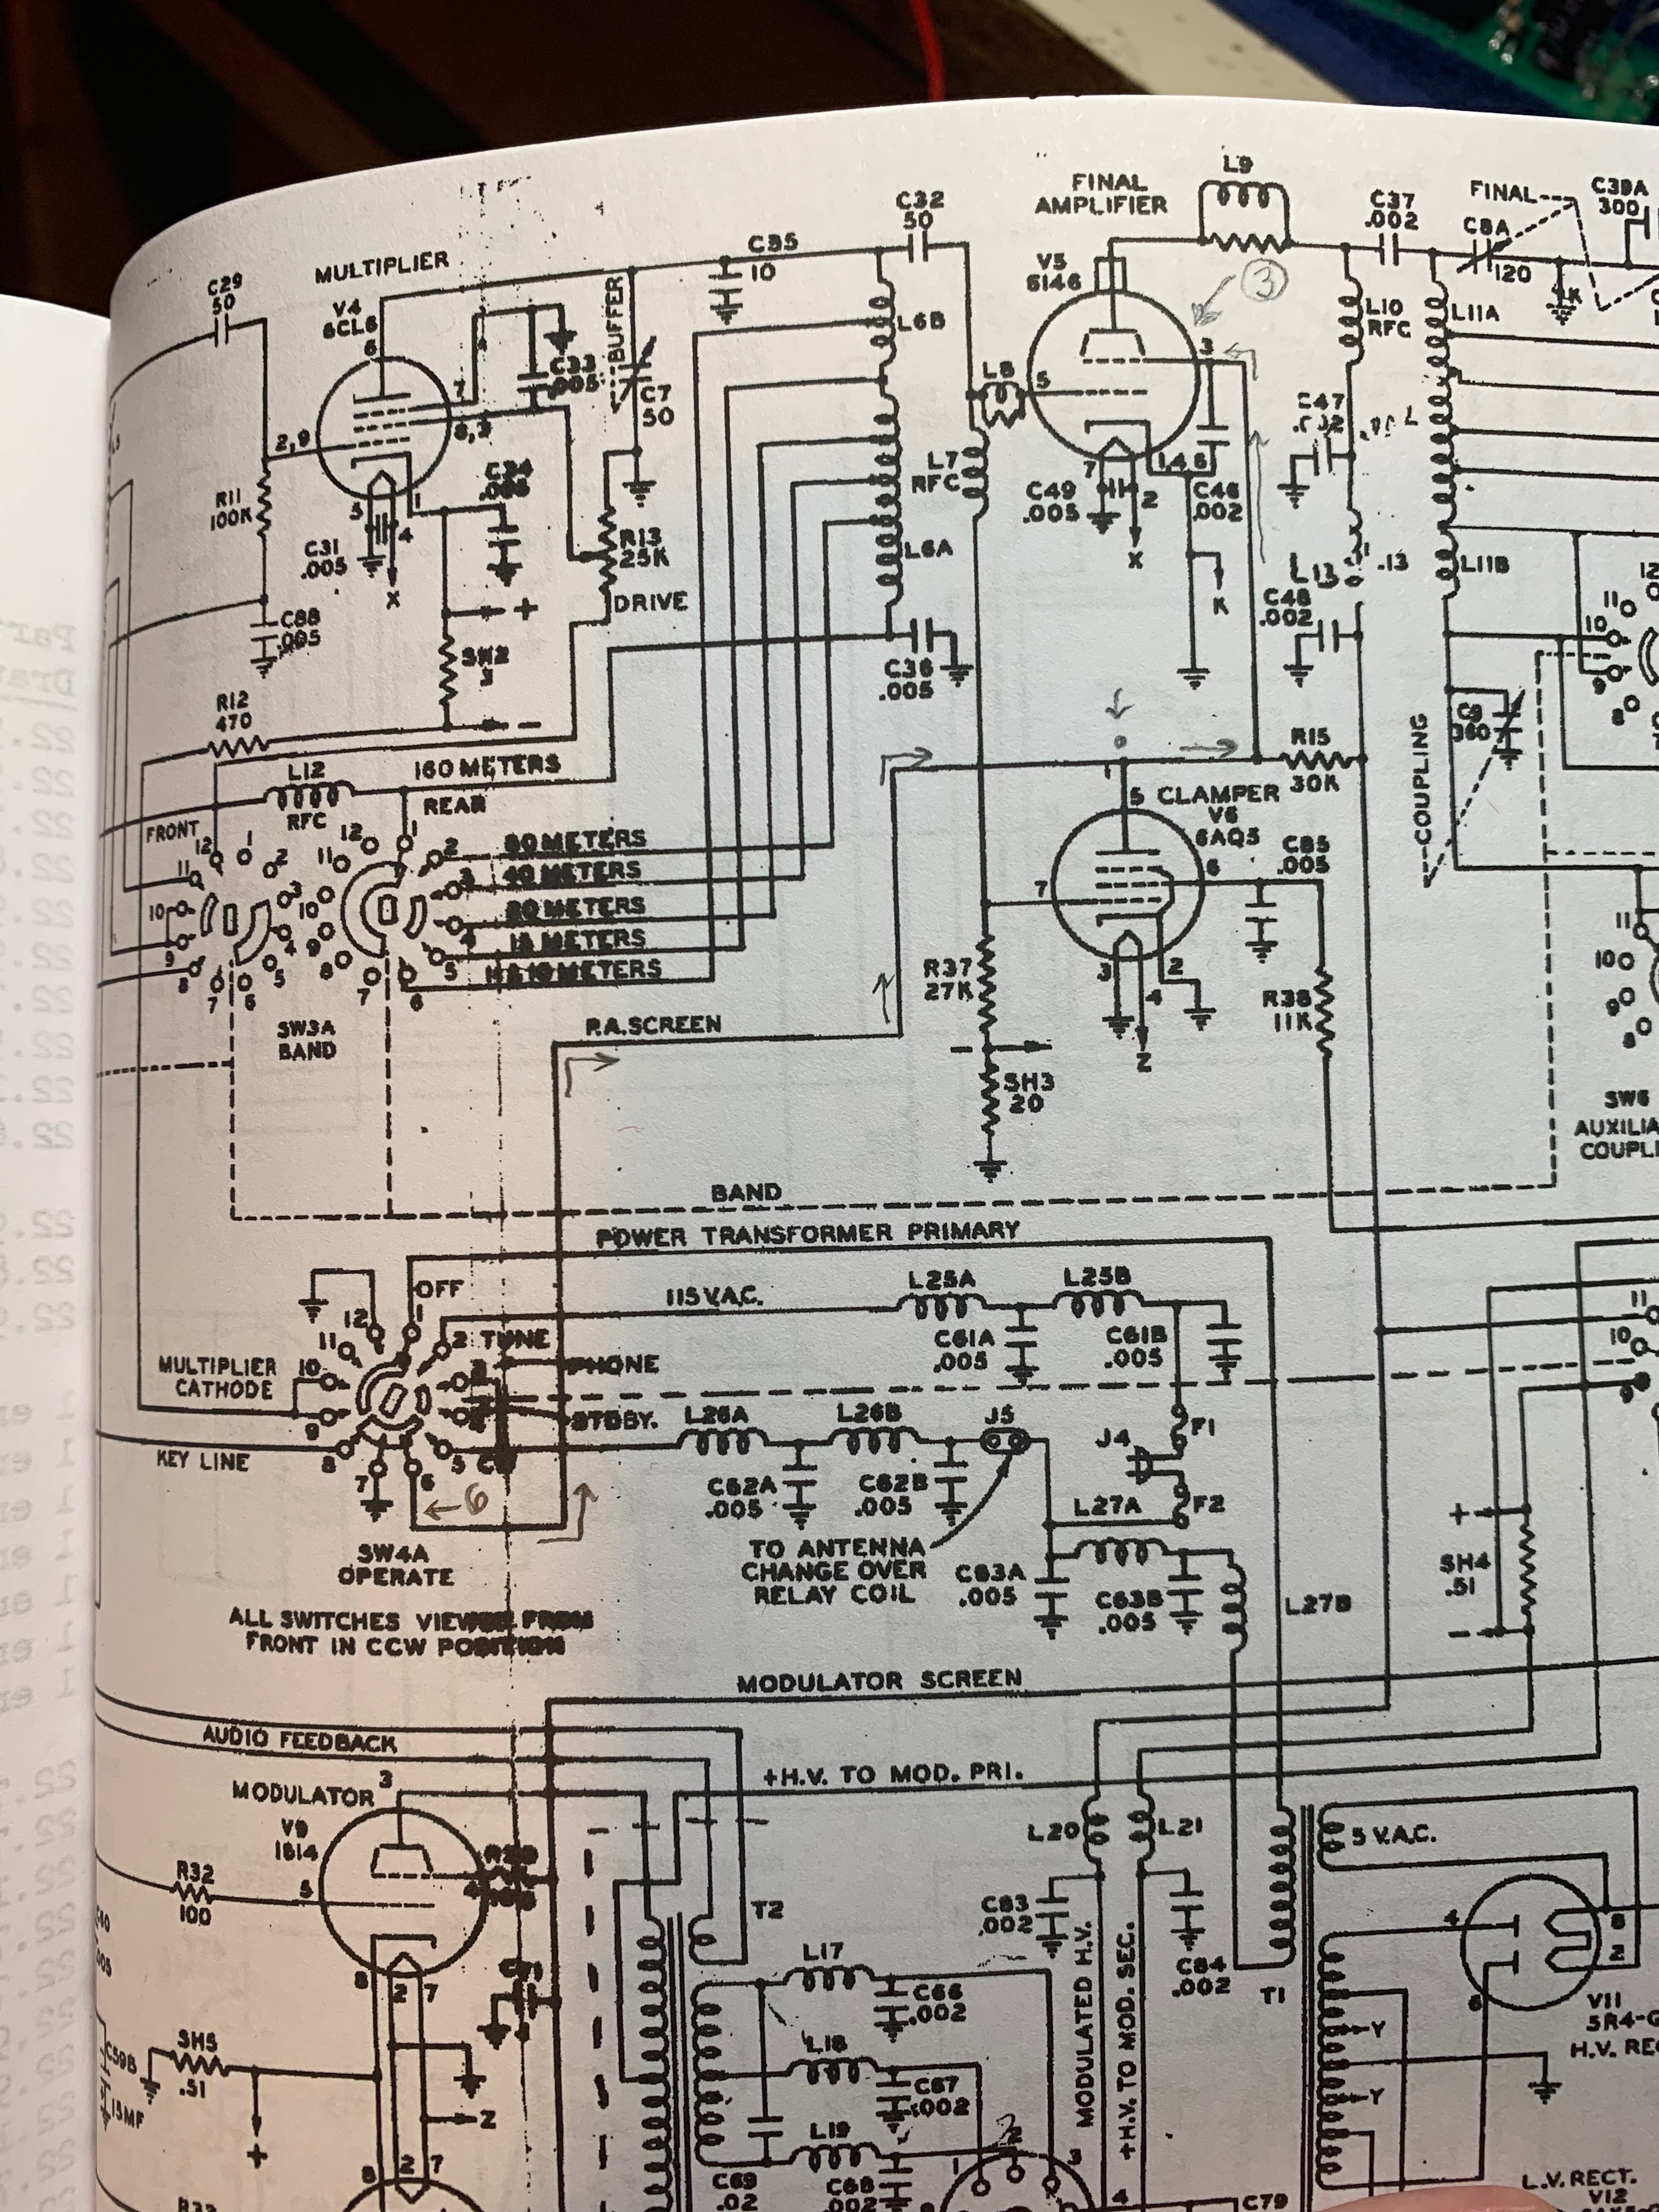
The schematic shows that green/white wire carrying the screen voltage to the 6146's pin 3, also to the clamp tube (6AQ5)'s pin 5. Any where you tap along this line, the same voltage is seen. RF is bypassed. And while there is plainly printed on D-Lab's instructions to NOT solder the relay directly to pin 3 of the 6146, I could find no real reason why! Another alternative would be to fish that green/white wire out of it's harness... which carried a gazillion other wires, and tap it... yet another mess. Frankly, there was no good solution. Soldering directly to clip 6 was clearly a disaster in the making. On the video Terry said "it's do-able". It may be on his early model Ranger, which has no key circuit sub-chassis, but in mine it would have been a mess.
So.... yeah, sorry. I ran a wire down to pin 3.
Shoot me, D-Lab. I'm a scofflaw.
But in retrospect, I still see no reason why not to, and to date I have had no issues in operation.

Maybe it's because I'm a home-brewer.... I'm used to things like this, tapping a rail somewhere along a bus. D-Lab never explains on the video or in print why tapping the 6146 screen-line is verboten. I could just as well have tapped at that terminal strip to the left. Or at the clamp tube. Or at shunt resistor R16. It made no measurable difference. So use your own judgement, dear Reader. And if down the line I do develop an issue associated with this, I will post and edit to this installment. As it is, I am writing this installment well after the fact, after many QSOs using this Ranger, and the relay has performed flawlessly. So has the Ranger itself.
'Nuff said.
Meanwhile, above deck....

These are those pre-installed taped off wires I mentioned earlier. Under deck they are connected where they need to be, and labeled as to which relay wire colour they attend to. The key circuit deck was removed just prior for the wiring and the threading of these wires back up to the upper deck. It is subsequently re-installed.

I mentioned these wires as being labeled. Here is how I did the labeling: all the wires were pulled below deck at one point, with heat shrink slid over all squegg splices. The associated wire colour is written on the heat shrink tubing itself. After shrinking, these wires are fed back above deck as I just described, and wired to a terminal board which I mounted on the key circuit sub-chassis deck utilizing pre-drilled holes which happened to be a perfect match for one of my milsurp terminal boards. Almost as if it that very teminal strip was meant to be there.

It all went together nicely. Everything connected in an organized manner. You can see the K2 relay installed, and the terminal strip that I mounted using pre-existing holes. After this, the relay was tested for function without the 5R4 installed. Afterward the 5R4 was plugged in.
Let me mention at the point the accessory plug, which I had to secure and wire up.
When I bought this Ranger, it had no accessory socket. When I made the need known. one of the members of the Amplitude Modulation Classics FB group spotted me the male Amphenal plug. I ordered the shell cover for it from eBay, and at the same time I ordered the two-pin Amphenol mic plug, also from eBay.
The wiring of this plug is simple, and I will post the wiring diagram, per manual schematic, also a couple shots of the finished accessory plug :


And she's still flying.
In summary, let me add that I did do one audio mod, which was recommended by Charles Rauch W8JI, and linked at Greg Latta's site. Here, Charles writes:
Change
C-52 from 500 pfd to
.02 mFd
OK, this is about the only major worthwhile effect, since it will bring low frequencies up several dB. In my own rigs, I've found that a change from 500 pF to .01 uFd was far more than enough.
OK, this is about the only major worthwhile effect, since it will bring low frequencies up several dB. In my own rigs, I've found that a change from 500 pF to .01 uFd was far more than enough.
Having changed out C52 between the first and second audio amps in the speech amplifier, I have received audio reports that range from "very nice" to "smooth" to "great!". I'll leave it there, gang.
That's all for now.
de wd4nka
No comments:
Post a Comment